TL;DR
Using the Snowflake Terraform provider maintained by the Chan-Zuckerberg Institute, we have automated the process of creating S3 bucket notifications, and Snowflake stages, pipes and tables for automatically loading data into Snowflake. We have published the module on the Terraform Registry.
Airflow
The vast majority of our infrastructure at Branch is deployed on AWS with Terraform, and
we love it to pieces. Among that infrastructure is a managed Apache Airflow (MWAA)
instance for pulling hundreds of different reports from different sources, often—but not
always—csv files. Airflow runs a proprietary Python package which defines a base Report
class for handling common operations across all reports—downloading locally for
development, saving processed reports to the right place, and moving them once loaded
into Snowflake. In the simplest cases, a subclass only needs to define its bucket
prefix. This focus on optimising the developer experience means we already have hundreds
of reports in place without employing ten data engineers or losing our minds.
Snowflake Pipes
Snowflake’s pipes are one of its key features. You define a stage (a place in cloud
storage which includes a file of a particular type and schema, and which allows you to
query the data as if it were a table); a table for its data; and a pipe—which defines a
COPY INTO statement for copying the data in the file to its target table. Crucially,
pipes can be set to autoingest based on notifications from e.g. an SNS topic (and its
equivalents on Azure and GCP).
It is possible to define a single topic on a bucket and have every PutObject event
fire it, while defining the filter for which files to ingest on the pipe. If you have
hundreds of different reports, however, this results in hundreds of pipes firing off
while only one ingests any data. The preferable approach is to define an SNS topic for
each individual prefix that a pipe ingests data from, which results in each pipe firing
only when it actually has data to ingest. The downside to this approach is of course
that we have to manage hundreds of resources across both AWS and Snowflake.
Enter Terraform
To manage this superfluity of resources, while still not losing our minds, we defined a Terraform module that handles the creation of the SNS topic and associated Snowflake objects with a few simple input variables. The only thing that then varies between reports is the bucket prefix (from which we define the table name), and the table schema itself. Continuing the lazy/efficient theme, we have a YAML file that defines the names and table structures, which is then read in with yamldecode. This includes options for everything that we can pass to the snowflake-table resource, including defaults and cluster_by.
snowpipe
snowpipe is a Terraform module based on the work that we’ve done at Branch, and in
particular simplifies things by removing the table creation process (we’ll publish that
soon too, in a separate module). It takes a number of inputs (the database name, storage
integration details, etc.) but the work on the developer’s side boils to:
- Deciding on a role name and path for the Snowflake integration
- Creating the storage integration and file format on the Snowflake side
- Defining a mapping from bucket prefix → Snowflake table
In our case, we map prefixes to tables directly from a YAML file, to take the guesswork out of which prefix goes where, as follows:
locals {
  tables         = yamldecode(file("tables.yaml")
  prefix_tables  = {
    for table in local.tables : "${table}/" => table
  }
}
In this example the contents of our YAML file–i.e. the prefix and table names–is:
- first
- second
- third
And then use the module:
module "snowpipe" {
  source                   = "branchenergy/snowpipe/snowflake"
  bucket_name              = var.bucket_name
  prefix_tables            = local.prefix_tables
  database                 = var.database
  schema                   = var.schema
  file_format              = var.file_format
  storage_integration      = var.storage_integration
  storage_aws_iam_user_arn = var.storage_aws_iam_user_arn
  storage_aws_external_id  = var.storage_aws_external_id
  snowflake_role_path      = var.snowflake_role_path
  snowflake_role_name      = var.snowflake_role_name
# }
Note that we don’t loop over prefix_tables with for_each or count; the module does
this itself using an inner module, as certain resources (the Snowflake assume role
privileges and the S3 bucket notifications) are shared across the different pipes.
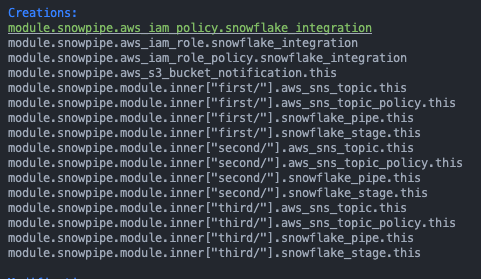
Here’s what the creation step looks like (in our custom Terraform process):

Here’re the bucket events created by the module:

And here’re the resulting pipes in Snowflake:

What’s Next?
We’re currently in the process of moving all our non-dbt sourced Snowflake infrastructure to Terraform. With the judicious use of modules and YAML-based configuration files, managing our entire Snowflake stack (with the exception of a few account-level admin things) is pretty straightforward.
We’re Hiring!
If this sort of thing sounds like your idea of fun (or at least more fun than most other jobs), and you’re somewhere around North or South America, or Westernish Europe or Africa, we’re currently hiring for Data Engineers.